Monday, February 25, 2013

From the Pinaholic: Baked Chicken with Baked Beans

So it’s one of those nights where it has been a busy day, and you haven’t decided on anything for dinner. The hour is fast approaching, your stomach is growling, and nothing has been set out to defrost. On top of all that you haven’t been grocery shopping so you’re working with a limited arsenal. What to eat?

Well some common American household foods are frozen chicken breast and baked beans. Both yummy items and both compliment each other’s taste palettes superbly. However, there is one more common ingredient that makes this a delicious dish. Ketchup or your favorite BBQ sauce!

With 3 ingredients this dish is super easy and totally delicious. Most certainly mark this down as another Pinterest success!

Ingredients

1.75 lbs. of boneless skinless chicken breast

2 28 oz. cans of baked beans

4 teaspoons of Ketchup or BBQ sauce

Tip:

If you are defrosting your chicken breast last minute fill the kitchen sink up with hot water. Allow to soak between 5-10 minutes depending on amount and sizes. I find I like this method more so than the microwave. –The Pinaholic

Directions

Preheat oven to 375 degrees.

Mix the ketchup/BBQ sauce with the baked beans. Put the chicken breast into a casserole dish and pour the baked beans over them. Place into oven until chicken is done, about 1 hour. (Longer if the chicken breast is frozen at the start.)

Number of Servings: 8

With a dish this simple, why not try it out? Unless of course you are a vegetarian because then I can understand the lack of enthusiasm. Seriously though, if you are not a vegetarian and you like chicken & baked beans this is a great dish to try.

To see the original version of this recipe, along with many other great ideas, click your way on over to  Spark Recipes.

From the Pinaholic: DIY Removing A Stripped Screw

Have you ever tried unscrewing a nail that is stripped? It’s a bitch, right? We think, one more twist & it’ll be out. Or you think you can see it unscrewing (which is really just a figment of our imagination) so we keep trying to force it out by the sheer power of our will. 9 times out of 10 we end up doing more damage because we just can’t leave it alone. Ultimately we over exert ourselves more than we need to for such a small problem (unless we have an extractor drill).

Well here is a Pinterest success that makes that whole process 100% easier.

By placing a wide rubber band in-between the stripped screw and the screw driver can sometimes help give enough grip to remove a slightly stripped screw head.

Wow, I just had my mind blown. I never knew it could be this simple to remove a stripped nail.

Now realize there are a few key words in the above directions. Specifically slightly stripped. So next time you run into a problematic screw, don’t over exert yourself & cause further damage to the screw head. Just grab a handy dandy rubber band and life will be much simpler (okay maybe not LIFE, but certainly those few, unregainable (stupid spellcheck thinks I spelled that wrong. wtf?! who’s the dumb one now?) moments).

This is one of those life-saving pins that is a must to know!

Thanks to Pinterest from all of The Pinaholics

To view this tip, along with a few other handy dandy ones, check out Home Hacks.

Monday, February 11, 2013

Greetings from The Pinaholic


Greetings & Welcome to the Pinaholic! I am going to take this time with my first post to get ourselves acquainted.

As a 23 year old stay at home mom with a 7 month old boy I get a few rare moments to myself. Sadly I do not have much of a life outside of the home which led to me discovering an interesting site: Pinterest.

Nothing can be said that better explains how I felt more than Love (with a capital L) at first sight! It was an amazingly easy website to use that combined one of my favorite activities to pass the time, Internet Window Shopping.

I dove into it, committing wholly to this new world of pins.

In less than a month I had amassed more than 2,000 pins spread over 24 boards!

But then I began to wonder what's the point? I had all these pins and had yet to try even one. Cooking (being another favorite activity of mine to pass time) starred prominently, leading the pack with 13 boards in which you could find any kind of recipe. A few other heavily pinned boards of mine were DIY Crafts Tips & Remedies, Fitness & Health, and Beauty Tips.

After testing out some of my cooking pins (all successful so far) I decided to create this blog to keep track of my progress. I want to share my successful & failed pins with everyone else just as addicted!

So what do you have to look forward to here at The Pinaholic? Well I would say that it'd be a fresh & funny take on life while learning which recipes are tested & proven (or tested & failed), DIY crafts tips & remedies that are useful (or not), exercises & healthy choices that are worth your time (or just a waste), and beauty tips to keep them coming back (or running away screaming).

Sincerely,

The Pinaholic

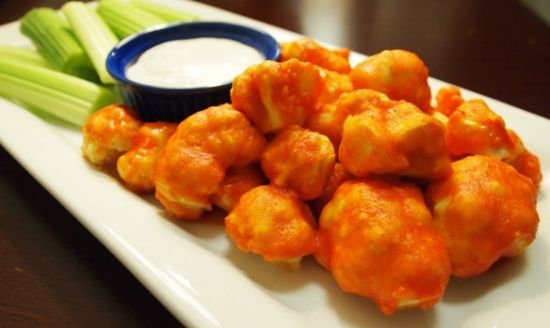
The Pinaholic: Buffalo Cauliflower

To sum up a few previous stated facts about me: I am 23 years old and am a stay at home mom to an incredibly handsome 7 month old boy (I admit, I may be biased). Some of my more favorite activities to pass the time include playing with my son, cooking, and a strong healthy addiction to Pinterest. A couple new facts about me: One of my favorite foods (you'll soon realize I have a lot of favorites) is cauliflower. Another is buffalo sauce (not exactly a food item by itself, but when I hear buffalo anything I'm on board). So when I ran into this recipe via Pinterest to say I was excited is putting it mildly. Through trial and error I know what to do and what not to do the next time I make this recipe. All-in-all I would rate this a Pinterest success. Word to the wise: Two things I enjoy are buffalo sauce & hot, but these packed quite a punch with the HOT buffalo sauce. Next time I will be using just normal buffalo sauce.

Ingredients

      1 cup water or soy milk
 
      1 cup flour (any kind will work—even gluten-free!)
 
      2 tsp. garlic powder
 
      1 head of cauliflower, chopped into pieces
 
      1 cup buffalo or hot sauce
 
    1 Tbsp. olive oil or margarine

Tip

When coating the cauliflower with the flour mixture try to be neat about it. I was in a hurry my first time and just splashed them in the mixture & dropped them onto the baking pan leading to a lot of excess batter that kept the cauliflower from getting crispy on the bottom. -The Pinaholic

Directions

Preheat the oven to 450°F. Combine the water or soy milk, flour, and garlic powder in a bowl and stir until well combined. Coat the cauliflower pieces with the flour mixture and place in a shallow baking dish. Bake for 18 minutes. Tip: 20 minutes if you like them crispier. While the cauliflower is baking, combine your buffalo sauce and olive oil or margarine in a small bowl. Pour the hot sauce mixture over the baked cauliflower and continue baking for an additional 5 to 8 minutes. Tip: 5-6 minutes is perfect for me, but you can go longer if you like them extra crispy. Serve alongside blue cheese or ranch dressing and celery sticks. Tip: I wanted to try these so bad that I entirely skipped any kind of dressing and celery sticks. They were great, but when my mouth was on fire I sure wish I had had it ready. The original copy of this recipe can be found at Spicy Buffalo Cauliflower.